2. Configure wpMula
If your site is not yet a multisite, we need to install it. The multisite feature is part of WordPress core, so it’s very stable. wpMula requires it to make your site multilingual. There are two ways to install Multisite:
1. **Automatic installation** — make your site writable and we’ll handle the setup for you.
If you see the button and message shown below, wpMula can install it automatically. Simply click **Setup Multisite and login again**, and your site will be converted to a multisite. After installation, you’ll be asked to log in again — this is normal and nothing to worry about.

2. Install it manually
Click the same button, but this time you’ll need to follow the standard WordPress steps. This method is a bit more advanced, but if you know what you’re doing, you’ll be fine. The basic steps are:
- Deactivate all plugins on your site
- Go to Tools → Network Setup
- Install the multisite and set the correct values in your
.htaccessandwp-config.phpfiles - Log in again
- Reactivate all plugins on your site
Here is a great guide to install a WordPress multisite.
—
https://example.com/wp-admin/admin.php?page=wa-wpmula
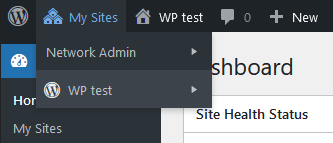
After this process, your site should now be a multisite. To confirm this, you should see **My Sites** in the top-left corner of your WordPress dashboard.
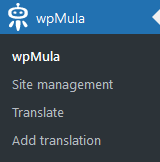
Under the **wpMula** menu on your site, you should now see additional menu items such as **Site Management** and **Add Translation**.
The next logical step is to install the new languages in WordPress that you need for your site. There are two ways to do this:
1. Through the main wpMula settings
Click the **wpMula** menu item in your admin bar on the left. Then select a language and click **Update** — it’s that simple.

2. When you add a new language to your site
When you add a new language to your site, you can also select any (new) language. In the next chapter, we’ll explain how to add a new translation to your WordPress site.

—
https://example.com/wp-admin/admin.php?page=wa-wpmula