7. Automatic translations
First you have to choose the type of engine you want to work with. Go to the general settings of wpMula and scroll to this section.
![]()
The click on the dropdown behind mode and choose how to translatie your content. The options are: DeepL free, DeepL pro, OpenAI, Claude and Gemini.
![]()
![]()
Next you have to enter the API key from the platform of your choice.
—
https://example.com/wp-admin/network/admin.php?page=wa-wpmula
First you will need to create DeepL account in order to get an API key. The steps are:
1. Create DeepL account
Go to the URL below and follow the setup steps. Don’t forget to verify your account (you will get an e-mail from DeepL) before continuing to the next step.
https://www.deepl.com/en/signup
![]()
![]()
2. Choose your API plan
The free version works great, but only for small websites. It limits at 500.00 characters per month. The pro version does not have any limit but a base price of 4,99 euro per month and 20,00 euro per 1.000.000 characters. Both will work with Mula, it is up to you.
![]()
![]()
Even if you choose for the free version of DeepL you need to enter your company information (and credit card). They will not charge you anything when you use the free version.
3. Create an API key
After you have setup your account you can create an API key here:
https://www.deepl.com/en/your-account/keys
Next copy/paste the api key after you create one.
![]()
![]()
4. Add the API key in the wpMula settings
Next go the wpMula settings and add the key. Then you can enable the automatic translations in the site management.
![]()
![]()
—
https://example.com/wp-admin/network/admin.php?page=wa-wpmula
5. Enable automatic translations
Next you can active the translations in site management. You can do this for alle translations or for specific languages. After you save the settings the translations are automated.
![]()
![]()
—
https://example.com/wp-admin/network/admin.php?page=management
If you want to use Gemini you will need a Google account (free or workspace). When you have a Google account you can go the ‘Google AI Studio’. Gemini also has a free version, but it is very limited in the amount of API calls. It is good for testing, but for translating a full website you will need to set up billing.
https://aistudio.google.com/
1. Find an API key
You can go to the following URL to create an API key for the translations with Gemini. If you are not logged in, login first with your Google account.
https://aistudio.google.com/u/api-keys
![]()
![]()
2. Create an API key (or use the default)
You can use the Default Gemini API Key if you are translating a single website. If you are using wpMula for multiple websites/clients it would be wise to create seperate keys for each client/website. This way you can easily track the usage/costs per key per client/website. For creating a new key click on ‘Create API key’.
![]()
![]()
3. Copy API key
The next step is to copy the API key into the wpMula settings. First click on the API key to see all the info.
![]()
![]()
Copy the API key from the dialog.
![]()
![]()
4. Paste the API code in wpMula
Then go to the wpMula settings and paste the key here.
![]()
![]()
—
https://example.com/wp-admin/network/admin.php?page=wa-wpmula
5. Enable automatic translations
Next you can active the translations in site management. You can do this for alle translations or for specific languages. After you save the settings the translations are automated.
![]()
![]()
—
https://example.com/wp-admin/network/admin.php?page=management
You will need to create an OpenAI account or use your existing account. There is no free version of the API, so you will need to setup billing.
https://platform.openai.com/login
1. Find an API key
You can go to the following URL to create an API key for the translations with OpenAI.
https://platform.openai.com/api-keys
![]()
![]()
2. Create an API key
Click on ‘Create new secret key’ in order to create a new API key.
![]()
![]()
3. Copy API key
The next step is to copy the new API key.
![]()
![]()
4. Paste API key
Then go to the wpMula settings and paste the key here.
![]()
![]()
—
https://example.com/wp-admin/network/admin.php?page=wa-wpmula
5. Enable automatic translations
Next you can active the translations in site management. You can do this for alle translations or for specific languages. After you save the settings the translations are automated.
![]()
![]()
—
https://example.com/wp-admin/network/admin.php?page=management
You will need to create an Claude account or use your existing account. There is no free version of the API, so you will need to setup billing.
https://platform.claude.com/
1. Find an API key
You can go to the following URL to create an API key for the translations with Claude.
https://platform.claude.com/settings/workspaces/default/keys

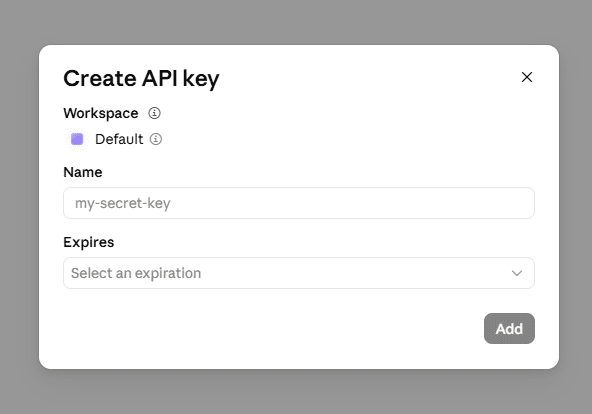
2. Create a API key
Click on ‘Create Key’ and fill in the information.
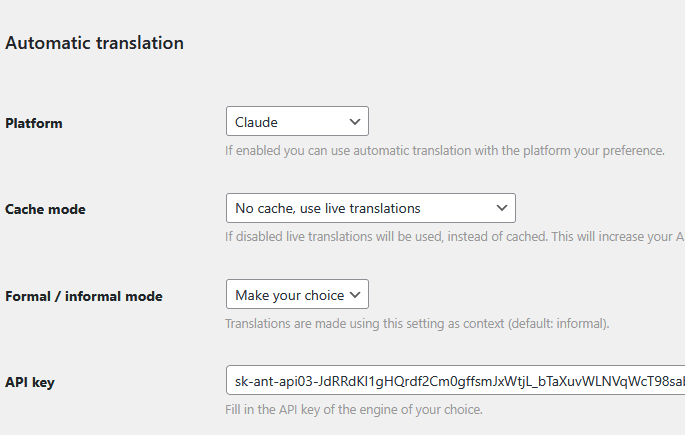
4. Paste API key
Then go to the wpMula settings and paste the key here.
—
https://example.com/wp-admin/network/admin.php?page=wa-wpmula
5. Enable automatic translations
Next you can active the translations in site management. You can do this for alle translations or for specific languages. After you save the settings the translations are automated.
![]()
![]()
—
https://example.com/wp-admin/network/admin.php?page=management
After setting up your API it is wise to test the configuration. This can be done under ‘Tools’. After going to tools click on ‘Test translations’. After this wpMula will try to translate the test string. If the message is green (and the text is translated) your setup works!
![]()
![]()
—
https://example.com/wp-admin/network/admin.php?page=wpmula-tools
You can apply an tranlsation on an existing page/post/category etc. Just navigate to the item in the back-end of WordPress and click on ‘translate’.
![]()
![]()
Next you will see the translation dialog where you can choose the ‘from’ and to ‘language’.
![]()
![]()
When you click on translate the content of this item will be automaticly translated.